Showing posts with label i made this. Show all posts

6.06.2014

Recipe: Strawberry Shortcakes

I've been on a sweets kick for the past few weeks and I've been whipping up a storm in the kitchen. And by whipping up a storm, I mean I made these twice.

Strawberry shortcake is one of those desserts that's so light and fluffy, it's just too easy to demolish a whole bunch of them in the span of time it takes to watch one episode of Judge Judy. Speaking of Judge Judy, did you see the primetime special that was on a few weeks ago? Did you see when they were showing footage of her when she was, like, in her 50's pumping iron at the gym like she was about to try out for Mr Olympia? YOU GO, J.J.!


Classic Strawberry Shortcakes

Adapted from BettyCrocker.com

Ingredients

4 cups strawberries (or however many you want)
1/4 sugar (depends on the amount of strawberries)
2 1/3 Bisquick mix
1/2 cup milk
4 tbsp sugar
3 tbsp butter, melted
Heavy whipping cream
Sugar, as needed


Directions

1. Prep the strawberries several hours ahead- preferably a full day, if you have the time. Remove stems and slice. Top sliced berries with 1/2 cup sugar. Depending on how sweet and syrupy you want them to become, you may want to add more or less sugar. The syrup part is my favorite, so I tend to put like a shit ton of sugar on it.


With blueberries, too.

2. In a medium bowl, mix remaining ingredients just until combined. The dough will be lumpy. On an ungreased cookie sheet, drop dough by 6-8 spoonfuls, depending on how big you want them.


3. Bake 10-12 minutes or until golden brown.


4. In a small bowl, add a couple of teaspoons of sugar to the liquid cream. Start there and add more depending on how sweet you want your whipped cream. Beat whipping cream until it reaches desired consistency. I like mine a little more on the soft, foamy side. Note: there's a fine line between "it's perfect" and "it's butter," so pay careful attention once your cream starts puffing up.

The fine line has been crossed.

The crunchy shortcake with the strawberry syrup and cream- omg. These honestly take almost no effort to make and even less to eat. Now put them all together and kiss that diet goodbye.


Read More

4.14.2014

Recipe: Chicken Tortilla Soup

Yesterday morning, I woke up craving chicken tortilla soup. I'd never made it before, but I'd been thinking about it for a while.

I looked around at a few recipes and settled on one that seemed easy and had pictures that looked good. Which, if you read my blog regularly, is how I always make my best decisions.


Slow Cooker Chicken Tortilla Soup

Ingredients

1 lb shredded chicken
1 (15 oz) can whole peeled tomatoes, mashed and chopped
1 (10 oz) can enchilada sauce
3/4 large onion, chopped
1 (4 oz) can chopped green chile peppers
3 cloves garlic, minced
2 cans chicken broth
1 tsp cumin
1 tsp chili powder
1 tsp salt
1/4 tsp black pepper
2 bay leaves
1 (10 oz) package frozen corn
1 tbsp chopped cilantro
7 corn tortillas
vegetable oil

Directions

1. Place all ingredients, from chicken to cilantro, in the slow cooker. Cover and cook on low for 6-8 hrs. It doesn't get much easier than that.


2. To make tortilla crisps: slice tortillas into strips. Fry in oil. Sprinkle with salt. Warning: these little guys can go from floppy to charred in no time, so make sure to keep an eye on them.


3. Serve with lime wedges, chopped avocado, cilantro, sour cream, cotija cheese, or whatever else strikes your fancy. 


This recipe gets a thumbs up from me, Eric, and my mom. And Mom usually has no problem telling me when my recipes suck. The only thing I'd try next time is to either use low-sodium broth or omit the salt. The soup was already plenty savory and I think the salt could be removed without affecting the overall flavor.


Read More

2.18.2014

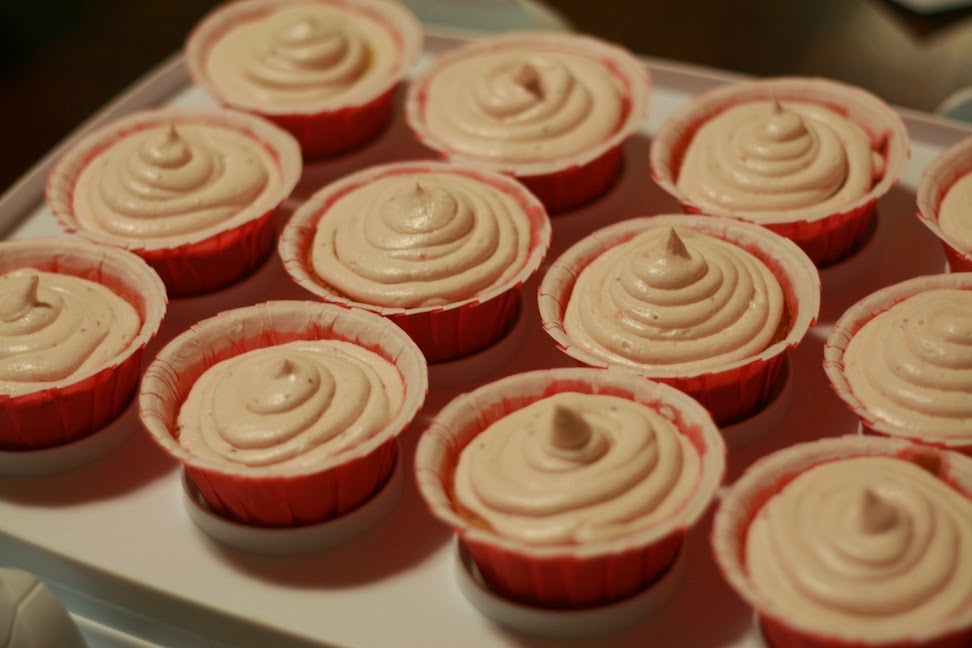
Recipe: White Velvet Cupcakes with Strawberry Buttercream Frosting

Last week, there was a Valentine's Day bake-off at work and I was drawing a blank on what to bring. I knew that I wanted to try something from scratch- i.e. no box cake. After a few minutes of Googling around, I found a recipe for White Velvet Cupcakes and matched it up with a recipe for Strawberry Buttercream Frosting.

The directions called for using the blessed Kitchenaid mixer- which by the way, I've had for six years and have managed to never use because I feel like it's the fanciest thing I'll ever own and therefore need to preserve it for as long as possible.

Long story short, the ingredients were all items I had here at home, the directions were easy to follow, and unfortunately I did not win the $20 Target gift card at work. (Cinna-Mon-Amour won; cinnamon + cream cheese? Please. It wasn't even a fair battle). But! I did get second place votes and someone asked me for my recipe, so at least there's that.

Yesterday was my mom's birthday and I made her the same cupcake/frosting combo. The directions were even easier the second time around and with the amendments I made below, yielded a more balanced flavor.

I feel like I'm ready to open my own bakery.


White Velvet Cupcakes

Adapted from this recipe at Fifteen Spatulas

Cupcake Ingredients

3 large egg whites
10 tbsp milk (sounds weird, I know)
1 1/2 tsp vanilla extract
2 cups sifted all purpose flour MINUS 4 TBSP
1 cup sugar
2 1/4 tsp baking powder
1 stick salted butter between 65 and 75 degrees (or on the coolish side)
(Frosting recipe below photos)

Directions

1. Preheat oven to 350F (176C).

2. In a small bowl, whisk egg whites, 3 tbsp of milk, and vanilla until combined. It will smell and look like horchata.


3. In a stand mixer fitted with paddle attachment, mix flour, sugar, baking powder, and salt on low for 30 seconds. Add the butter and the rest of the milk and mix on low until the dry ingredients are moistened. Increase the speed to medium and beat for 90 seconds.


4. With the mixer on medium low speed, slowly add half of the egg mixture and beat for 30 seconds. Scrape down the sides and repeat with the remainder of egg mixture. It will be thick, like pancake batter.


5. Pour into lined cupcake pan; fill to approximately half full. Bake for approximately 20-22 minutes, or until a toothpick comes out clean. Remove cupcakes to a wire rack to cool.


6. Once cupcakes have cooled, top with frosting and enjoy!


UPDATE: My mom, niece, Eric, and I all loved them. It was noted that the frosting was the best part. My brother-in-law thought they were muffins. I'm not sure what that says about my baking/presentation skills.

Strawberry Buttercream Frosting

Frosting Ingredients

1 basket of strawberries, sliced
1/2 cup granulated sugar
1/2 cup water
2 sticks of salted butter
4.5 cups confectioner's sugar
1 tbsp vanilla extract
2 tbsp milk (optional)

Directions

1. In a small saucepan, combine strawberries, water, and granulated sugar and bring to a boil over medium low heat. Reduce heat and allow to simmer for 10 minutes. Remove from heat and blend until smooth. Chill for 20 minutes or store for future use.

2. Cream butter and 1/2 cup confectioner's sugar, then add 1 tbsp of the strawberry syrup. Repeat until all of the sugar and 7 tbsp of the strawberry syrup have been added. Add vanilla and beat on high for about 20 seconds.

3. If your frosting needs to be thinned out, add milk, starting with 1 tbsp at a time. (Both times that I made the frosting, I didn't need milk at all.)

4. Use immediately or refrigerate up to three days. To bring frosting back to life after refrigeration, allow to reach room temperature, then beat on low until smooth.

Note: My frosting didn't turn out very pink. In fact, it's on the pale side. If you want a more pinky effect, I'd suggest adding a drop of red food coloring.


Read More

2.13.2014

Recipe: Raspberry Coconut Layer Bars

The other day, I walked by the kitchen at work and saw these raspberry beauties out on the counter, just begging me to eat them. Not wanting everyone at work to know how well I can tie on the old feedbag, I looked disinterested and nonchalantly grabbed one on my way to my desk, like "Oh hey. What's this. Sure, I'll take one. I guess."


It was the so freaking good, it took everything in me to not go back and eat the whole plate.

After casually inhaling two more, I complimented my coworker Jill on her handywork and basically begged for the recipe.

Hopefully, it's not a secret family treasure because I'm totally sharing it right now with the whole, wide world (and by world, I really just mean my mom and two friends in Casper, WY).


Raspberry Coconut Layer Bars

Ingredients

1 2/3 graham cracker crumbs
1 stick melted butter
7 oz sweetened flaked coconut
14 oz can sweetened condensed milk
1 cup raspberry jam (roughly 3/4 of the jar, if you don't feel like measuring)
1/2 cup chopped, toasted walnuts

Directions

Preheat oven to 350.

1. Mix together graham cracker crumbs and butter. Press into a compact crust in a 9x13 baking dish.


2. Spread coconut evenly over crust.


3. Pour condensed milk evenly over coconut.


4. Bake for 20-25 minutes, or until the edges turn golden.


5. Let cool, then evenly spread jam over everything. (It will seem like there's not enough, but there is.)


6. Chill 3 - 4 hours. Top with toasted walnuts; you may want to use more than 1/2 cup. As you can see in the photos, it's on the sparse side.


7. Cut into squares/ rectangles and serve!


I made these for our Super Bowl party and they were a fucking hit. Not to mention, they were super easy to make. Anything that's easy to throw together and makes me look like I know what I'm doing in the kitchen gets a thumbs up in my book. Five chins all around!


Read More

1.06.2014

Recipe: Enchilada Casserole

According to the website where I found this recipe, this meal is technically called Mexican Lasagna. However, in my house, we call it Enchilada Casserole because that's actually what it tastes like. And besides, Mexican Lasagna sounds gross.


ENCHILADA CASSEROLE
Adapted from this recipe on myrecipes.com

INGREDIENTS
1/2 lb mild pork sausage
1/2 lb ground beef
15 oz can black beans, drained
2/3 cup canned diced tomato with green chiles
1 tsp garlic powder
1 tsp ground cumin
1/2 tsp salt
1/2 tsp pepper
1 can Cream of Celery soup
1 can Cream of Mushroom soup
1 (10 oz) can enchilada sauce
15 corn tortillas
2 cups shredded Cheddar cheese
1 cup shredded Monterey Jack cheese

OPTIONAL
1 medium tomato, seeded and diced
4 chives, chopped
1/4 cup fresh cilantro, chopped
Avocado, chopped
Sour cream

DIRECTIONS
1. Cook sausage and ground beef in a skillet over medium heat until meat is crumbly and no longer pink.

2. Stir in beans, canned tomatoes, garlic, cumin, salt, and pepper. Cook until thoroughly heated.

3. In a separate saucepan, combine soups and enchilada sauce. Cook until thoroughly heated.

4. Spoon a small amount of the sauce into the bottom of a lightly greased 13x9 baking dish; top with six tortillas so that the bottom of the dish is evenly covered. Spoon half of the beef mixture, then half of the sauce onto the tortillas; sprinkle with half of the Cheddar cheese. Top with six tortillas and repeat the same layering process; meat, sauce, cheese. Final layer should be the three remaining tortillas, placed right down the middle. Sprinkle with Monterey Jack cheese.

5. Bake at 350F (176 C) for 30 minutes. Let dish sit for 5 minutes before serving.

6. Serve and top with desired toppings; fresh tomato, chives, cilantro, sour cream, and avocado.


I know the thought of those creamy canned soups in Mexican food seems unappetizing and wrong, but trust me when I say that this dish blew our minds. Eric, my mom, and I were all pleasantly shocked as we scraped up every last bite from our plates. It's an all-in-one and easy to throw together. It does require several oddball ingredients that I wouldn't normally have on-hand, but it was totally worth it and honestly tasted like an awesome entree you'd get at a legitimate Mexican restaurant. I'd recommend this recipe for your next get-together because it seems like a crowd-pleaser (as long as your crowd likes Mexican food) and it makes a lot, probably about 8-10 servings.

Also, MAKE SURE TO TOP WITH SOUR CREAM AND AVOCADO (if you're into that sort of thing). The meal itself has a little spice to it, so the creaminess of the sour cream and avocado are a perfect balance.


UPDATE: We just ate the leftovers from this meal (which was originally made several weeks ago and had been stored in the freezer) and it held up like it was freshly made. Just reheat in the oven at 400F (204C) for about 20 minutes, or until hot throughout.


Read More

1.01.2014

Crock Pot Loaded-Baked-Potato Soup

Just in case you haven't carbo-loaded enough during this blessed season, I thought I'd throw in a solid contender for potato recipe of the year.

While looking through search results for "potato+crock pot" the other day, I decided to give this recipe a shot since the user photos actually looked appetizing, and not like horse slop. I already had over half of the ingredients in my kitchen and the directions only involved 3 steps. I'll basically try any recipe if it meets these two requirements.


Crock Pot Loaded-Baked-Potato Soup
Adapted from this recipe on food.com


INGREDIENTS
5 large potatoes, peeled and cut into 1/2 inch cubes
3/4 large white onion, chopped
29 fl oz chicken broth (or two cans)
3 garlic cloves, minced
1/4 cup butter
2.5 tsp salt
1 tsp pepper
1 cup half and half (or cream)
1 1/4 cup shredded Cheddar cheese

OPTIONAL TOPPINGS
Chives
Bacon
Cheddar cheese
Sour cream

DIRECTIONS
1. Combine potatoes, onion, chicken broth, garlic, butter, salt, and pepper in crock pot. Cover and cook on low for 8 hours.

Before cooking

After cooking

2. Cook bacon. Chop into bite-sized pieces once cooled.


3. Mash crock pot mixture until potatoes are coarsely chopped, or until soup is thickened to your liking.

Your mouth will be watering for applesauce because that's what it will look like

4. Stir in cheese and half and half.

5. Serve and top with desired toppings.


We saved time by prepping the potatoes the night before and just stored them in cold water in the fridge overnight. The onions could probably also be chopped the night before, but just make sure to double bag those fools, otherwise your whole fridge is going to stink like Cool Ranch Doritos.

This recipe was super easy and yielded a crock pot full of hearty comfort food. Easy enough to prepare on a workday and fills your house with the scent of potato goodness.


NOTE: This soup doesn't reheat very well. It basically turns into a bowl of thick potato mush, and that was even after thinning it out with a little more half and half. Mark my words; this one is best when fresh.


Read More

© Things I Like to Eat (...and Other Nonsense), AllRightsReserved.

Designed by ScreenWritersArena